Friday, May 31, 2013

#45 Toaster Pastries

I have never purchased store bought toaster pastries in all of the 13 years that I have been a mom. So I was pretty excited to make these for the kids. I had some left-over pie crust from the quiche I made, so I thought it was high time I tried the cover photo recipe from "The Homemade Pantry."

Toaster Pastries
Makes 6 pasteries

One recipe pie crust
Flour for work area
1 large egg, beaten with 1 Tbsp. water
6 Tbsp filling of choice
Optional: powdered sugar for dusting

1. Prepare the pie crust described in my last post....it's here.

2. Preheat the oven to 375 degrees. Line baking sheet with parchment paper.

3. Roll the first disc of pie crust on a lightly floured surface into a 9 x 12 inch rectangle, cutting any errant edges with a sharp knife.

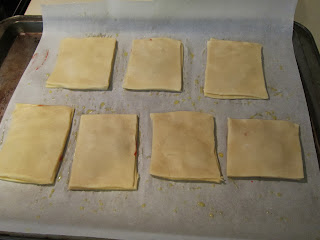
4. Cut the rectangle into six smaller rectangles. Gently separate the rectangles from the work surface and lay them on the prepared baking sheet with at least 2 inches between them.


Since I was using left over pie crust, my rectangles were all different shapes and sizes, which suit my family.

I made 7!
 
5. With a pastry brush, paint each rectangle with the egg wash. You will have some egg mixture left, set that aside.


6. Scoop 1 tablespoon of filling onto each rectangle with filling in a thin line down the center.

I used my yummy strawberry freezer jam for filling. But feel free to use whatever you want....for example, any jam flavor, Nutella, or cinnamon and sugar. You can even make them savory with pesto, ricotta, tomato sauce and cheese....you get the idea.


7. Roll out the other disk of pie crust and repeat steps 3 and 4. Lay the new batch of rectangles over the filling and seal them together by pressing a fork around the perimeter.

 
Using a pastry brush, paint the tops with remaining egg wash and poke several holes on the top with a fork.


8. Bake for 20-25 minutes, or until golden. Cool on a wire rack for at least 20 mniutes before dusting with powdered sugar or glazing with powdered sugar frosting.


You can store baked pastries in the refrigerate for up to 3 days- then reheat in a toaster or 375 degree oven for 5 minutes. Freeze unbaked pastries in a single layer on parchment-lined baking sheet and transfer to freezer-safe container with layers of parchment- bake when ready to serve.

They were very good and worth the extra effort....especially for something special. We all loved them and my oldest daughter already requested them for a special treat for her birthday breakfast. They are not something we would have all the time, but that's what makes them a treat:)

Wednesday, May 29, 2013

#44 Pie Crust

I'm using my own tried and true pie crust recipe....and actually, believe it or not, I do not love pie. So I do not make it often, but I considered it a personal challenge years ago to get really good at making pie crust. It was probably all those early years in my marriage watching Martha Stewart on a daily basis. So this recipe actually comes from Martha. It's her "Perfect Pie Crust- Pate Brisee." I use a food processor for this recipe...I've never made pie crust without one.

Pie Crust
Makes 2 single 8-10" crusts or 1 double

2 1/2 c. all purpose flour
1 tsp. kosher salt
1 tsp. sugar
2 sticks cold butter butter, cut into pieces
1/4-1/2 c. ice water
Make sure all your ingredients are cold


1. Place flour, salt and sugar in a food processor bowl and process a few seconds to combine. Add butter pieces and process until the mixture resembles course meal, about 10 seconds.

 
2. Add ice water in a slow steady stream, through the feed tube with the machine running, just until the dough holds together. I actually use ICE water, so I place a strainer over the feed tube to prevent ice from falling in.

 
Above is what it will look like when your dough is right. The amount of water you use will depend on the humidity in the room etc. Do not process for more then 30 seconds. If you have your ingredients all together...making a pie crust this way will literally take less then a couple minutes.

3. Turn dough out onto a work surface. Divide into two equal heaps and place on two sheets of plastic wrap. Flatten to form disks. Wrap and refrigerate at least one hour before using.

 
I use the plastic wrap to form into a disk.


At this point you can refrigerate about 2 days before using or freeze for up to one month.

To roll into a pie crust......

After at least an hour in the fridge take one disk out and place on a floured work surface.


The trick to rolling it out is to constantly turn and flip your crust to prevent sticking and to only roll in one direction.


Once your crust is a good size....about 12 inches in diameter, you are ready to place it in your pie plate.


I roll it onto the rolling pin slightly to transport it to the pie plate.

 
Unroll into the pie plate. I use a glass one, so I can see the bottom of the crust during the baking process.

 
Gently work the crust into the bottom and up the sides of the pie plate.


Using a kitchen scissors, cut the extra crust, leaving some on the outer edges for fluting. If you are making a double crusted pie...it is at this point that you add your filling before topping that with the top crust. I am making a quiche, so the rest of the pictures are for a single crusted pie.


I use my thumbs and pointer finger to make a fluted edge.


For my quiche recipe I brushed it with oil and docked it. Then it is important to put it back into the refrigerate for about 30 minutes. This goes with all pies, in my humble opinion. The rule is make it cold and bake it hot. So make sure your pie is good and cold when it goes into the oven, that way it will hold it's shape.

That is it....not too hard. Actually it's quite easy and much better then store bought crust.


Tuesday, May 28, 2013

#43 Vanilla Extract

Back in January, when I started this "homemade pantry" journey, I ordered some wonderful, big, plump vanilla beans. At that time I also ordered a bottle for making homemade vanilla extract. That's about all you need to do to make your own vanilla extract. I recommend ordering your vanilla beans online. I have not really seen good ones in your typical grocery stores. But then again, maybe I didn't look too hard. I got them at www.Beanilla.com for about 90 cents each.

Vanilla Extract

Cheap vodka, enough to fill your bottle or jar
Spent vanilla beans, at least 3


I used new fresh vanilla beans because I wanted to get it started and didn't know when I would be using my vanilla beans for something else. So I just scrapped my three beans, cut them in half and added the beans and the lovely seed scrappings to the vodka. Then you just need to wait. The book says at least three weeks. I think I waited longer before actually using it.


My rule of thumb was to just give it a whiff....when it smells like vanilla and it's a lovely brown color...it's ready! I've used it in my baking and whipped cream....just divine! The best part. As long as you have vodka on hand, all you need to do is top it off and keep adding used beans to it....unending supply of pure vanilla extract. If you are a baker...can anything be better?!


Monday, May 13, 2013

#42 Lasagna

Now the big moment is here....an almost completely homemade pan of lasagna..

Lasagna

12 oz. ground beef
1 large chopped onion
2 cloves garlic, chopped
1 (8oz.) can tomato sauce
1 (6 oz.) can tomato paste
1 quart jar of cooked-down tomatoes (I will blog my canned tomatoes this summer)
1 Tsp. italian seasoning
1 Tbsp. sugar
Homemade pasta dough
1 beaten egg
1 Tbsp. dried parsley
Homemade ricotta
1/4 cup Parmesan cheese- grated
Homemade fresh mozarella- sliced
Grated parmesan

1. First make your ricotta.....the process is here!

2. Next make your mozarella...the process is here!

3. Next make your sauce....brown the ground beef along with the onion and garlic. Add in your one quart of home-canned tomatoes, sauce and paste. Add the italian seasoning and sugar. Stir together well over heat and then set aside.

 
4. Next make your filling...stir together homemade ricotta, beaten {backyard} egg, 1/4 cup of parmesan and parsley. And set aside.


5. Make your pasta dough...that is here!

6. Lay your fresh pasta directly in the 9x13 lasagna pan, but before you do, spread a layer of sauce on the bottom of the pan. I like to use a glass Pyrex.

*I did not spread the layer of sauce down before that first layer of fresh pasta and I regretted that later.

7. Next spread half of the ricotta filling over the pasta.


8. Follow that will half of the meat sauce and then half of the sliced mozzarella.


9. Repeat with layer of pasta, ricotta filling, sauce then mozarella. And finish with a sprinkling of parmesan.


10. Bake in a 375 degree pre-heated oven for 30-35 minutes or until heated through. Let stand for 10 minutes before serving.


Here it is.....sure looks yummy!


And serve with a piece of garlic toast made with homemade bread!

So what is the verdict...was it the best lasagna I have ever eaten?????...Well no, not exactly. I was disappointed. The bottom layer of pasta was dry and tasted more like a flour crust. The second layer of pasta tasted much more like a noodle, so I think it would have been much better if I added that layer of sauce on the bottom of the pan. Which is why I added that step in the directions. Don't get me wrong, it was pretty tasty otherwise. Will I be making homemade, homemade, lasagna again? Not until I get a pasta roller! Because homemade pasta really needs to be thinned to a thickness that is hard to achieve with a rolling pin.

Sunday, May 5, 2013

#41 Pasta Dough

Another step in the homemade lasagna journey...pasta dough. I decided to go ahead and give the pasta dough a whirl, even though I do not have a pasta machine. I thought that lasagna noodles didn't have to be super thin anyway.

Pasta Dough

2 cups all purpose flour
3 large eggs

1. Scoop the flour onto the counter and shape it into a volcano.

 
Break the eggs into a bowl, pour them into the center of the volcano. Oh....did I mention that my beautiful eggs are home grown too.


Then beat eggs with a fork, just incorporating the yolk and the whites. Use the fork to gently mix the flour into the egg mixture working from the center out, maintaining the wall of the volcano as the center hole gets bigger. Don't be afraid of errant egg skating across the counter- just guide it back to the mix.

 
When the egg is thoroughly incorporated, push the dough together into a ball and cover with a damp cloth or plastic wrap while you clean your hands and your work surface.


Mine was a little dry and it would not come together, so I wet my hands with water and just that little bit of water helped it come together. Unwrap the dough and place on a clean counter and begin kneading it.  Vigorously push the dough down and away from you with one hand and fold it over with the other for about 5 minutes or until dough has a smooth surface.

 
Cut the dough into 6 pieces and shape into balls. Cover with plastic wrap and rest for 30 minutes.

If you are using a pasta roller ,follow your machine's instructions. If using a rolling pin, roll out each ball of dough, one at a time. To mimic the gradual thinning of the pasta roller, first roll to one thickness, then thinner, then thinner until 1/16 of an inch. Cut to your preferred shape. I left mine in big sheets for the lasagna. You do not need to boil the pasta first when making lasagna.


If you are not using right away, hang pasta to dry until ready to cook, at least 5 minutes, up to 2 hours. Make sure the pieces of pasta do not touch as they dry, or they will stick together.
You can keep pasta dough wrapped in plastic in the fridge for 2 days. Dried pasta wrapped into small nests, covered container for 2 days. In the freezer, first dry at room temp for 1 hour, then place in freezer bag up to 3 months- cook right from the freezer.