Wednesday, October 30, 2013

#66 Roasted Tomatoes

At the beginning of the harvest season there are always those first few tomatoes that ripen before the rest really get going. So I do not have enough to can but I want to be able to "put them up" somehow.
So I decided to give the roasted tomatoes for the freezer a try. It is a recipe from The Homemade Pantry.

Roasted Tomatoes

6 pounds, ripe, cored, halved tomatoes
1 head garlic, cloves separated and peeled
Fresh herbs, oregano, thyme, basil
Salt and pepper
Olive oil

 
Ahhhh, my tomatoes are so beautiful!!!


I washed, cored and quartered my tomatoes and measured them out...6 lb. 4.3 oz. That should do it!

 
I picked some fresh thyme and oregano from my garden! Sweet satisfaction going out to pick fresh herbs:) Oh...I also rinsed them and set to dry on paper towels.


In a large bowl, I tossed together tomatoes, garlic cloves, fresh herbs and olive oil. Just drizzle  enough oil to coat nicely.

 
Lay the tomato mixture on two parchment lined baking sheets making sure the tomatoes are cut-side up.

Then....roast for 5 hours in a pre-heated 275 degree oven.


This is what you will get and the smell is delicious! Let cool completely and then pour the contents of the trays into freezer bags.

 
Label freezer bags and pop into the freezer. I ended up with two quart sized bags from the 6 pounds of tomatoes.

What you essentially have is ready-made sauce in a bag. All you need to do is sauté an onion, throw in your thawed sauce and heat for about 20 minutes. Then toss sauce with a pasta of your choice. Add another drizzle of olive oil and freshly grated parmesan cheese along with some warm garlic bread on the side...ymmmmmmy!

I have not actually tried this yet. I thought it would taste most wonderful in January when the smell of roasted tomatoes will be a welcome treat. I will report back when we give it a try! Maybe next year I will be making even more roasted tomatoes; it sure is an easy way to "put up" tomatoes.

Tuesday, October 29, 2013

#65 Salsa

I try to grow most everything I need for homemade salsa. I love to especially make fresh salsa and I regret not taking pictures when I made it fresh his past summer. The recipe that I'm going to share is for canning.

Jalapeno Salsa
Yields about 3 pints

3 cups, chopped, seeded, peeled, cored tomatoes
3 cups chopped jalapeno peppers
1 cup chopped onion
6 cloves garlic, minced
2 Tbsp. minced cilantro
2 tsp. oregano
1 1/2 tsp. salt
1/2 tsp. cumin
1 cup cider vinegar
3- 6 oz. cans of tomato paste


1. Use rubber gloves when cutting your jalapenos. Just trust me on this one. Wear gloves! I remove the seeds and much of the inner spines cause that is where the heat is. Unless you like spicy salsa.


2. I use my Roma strainer with the salsa screen attached. My strainer does not strain out the tomato seeds, but I'm okay with that. I purchased my Roma strainer here and the salsa screen here.

 
3. Combine all the ingredients in  large saucepot.


 Vinegar is important because it brings the acid level to the right level so this salsa can be safely canned using the boiling water bath canning method.


I add tomato paste to my salsa as well to thicken it. Bring the salsa to a boil.


Ladle hot salsa into sterilized hot jars, leaving 1/2 inch headspace. Adjust two-piece caps. Process 15 minutes in a boiling water canner.

 
Homemade salsa....much preferred to the store bought. It just tastes better. Especially when you can pick the tomatoes and peppers organically from your own garden. Such a satisfying, simply pleasure in life!

Monday, October 28, 2013

# 64 Canned Tomatoes

There is one very essential puttin' up food that I MUST do every year and that is tomatoes. I plant about 18 tomato plants a year to give me the tomatoes I need to can. We roughly go through about 60-70 quarts of "stewed tomatoes" a year. I use them as a base for spaghetti sauce, chili as well as many of the soups I make. And those meals are my families very favorite foods, so it is important that I get all my tomatoes canned. This post will be a great canning 101 too. At least canning with a boiling water bath. It is difficult to list this recipe in amounts because everything really depends on how many tomatoes you have, what type you have, etc. So I will just be speaking of the procedure for properly and safely canning tomatoes.

Canned Tomatoes
You will need:
Tomatoes, bottled lemon juice, canning salt, mason jars, two-part canning lids/rings and water bath canning equipment

First pick, wash and de-stem the tomatoes. I had lots of beautiful organic tomatoes this year.

 
Next, wash your jars, lids and rings in hot soapy water and set aside.


Get your large canner filled with water, covered and on the stovetop to boil.


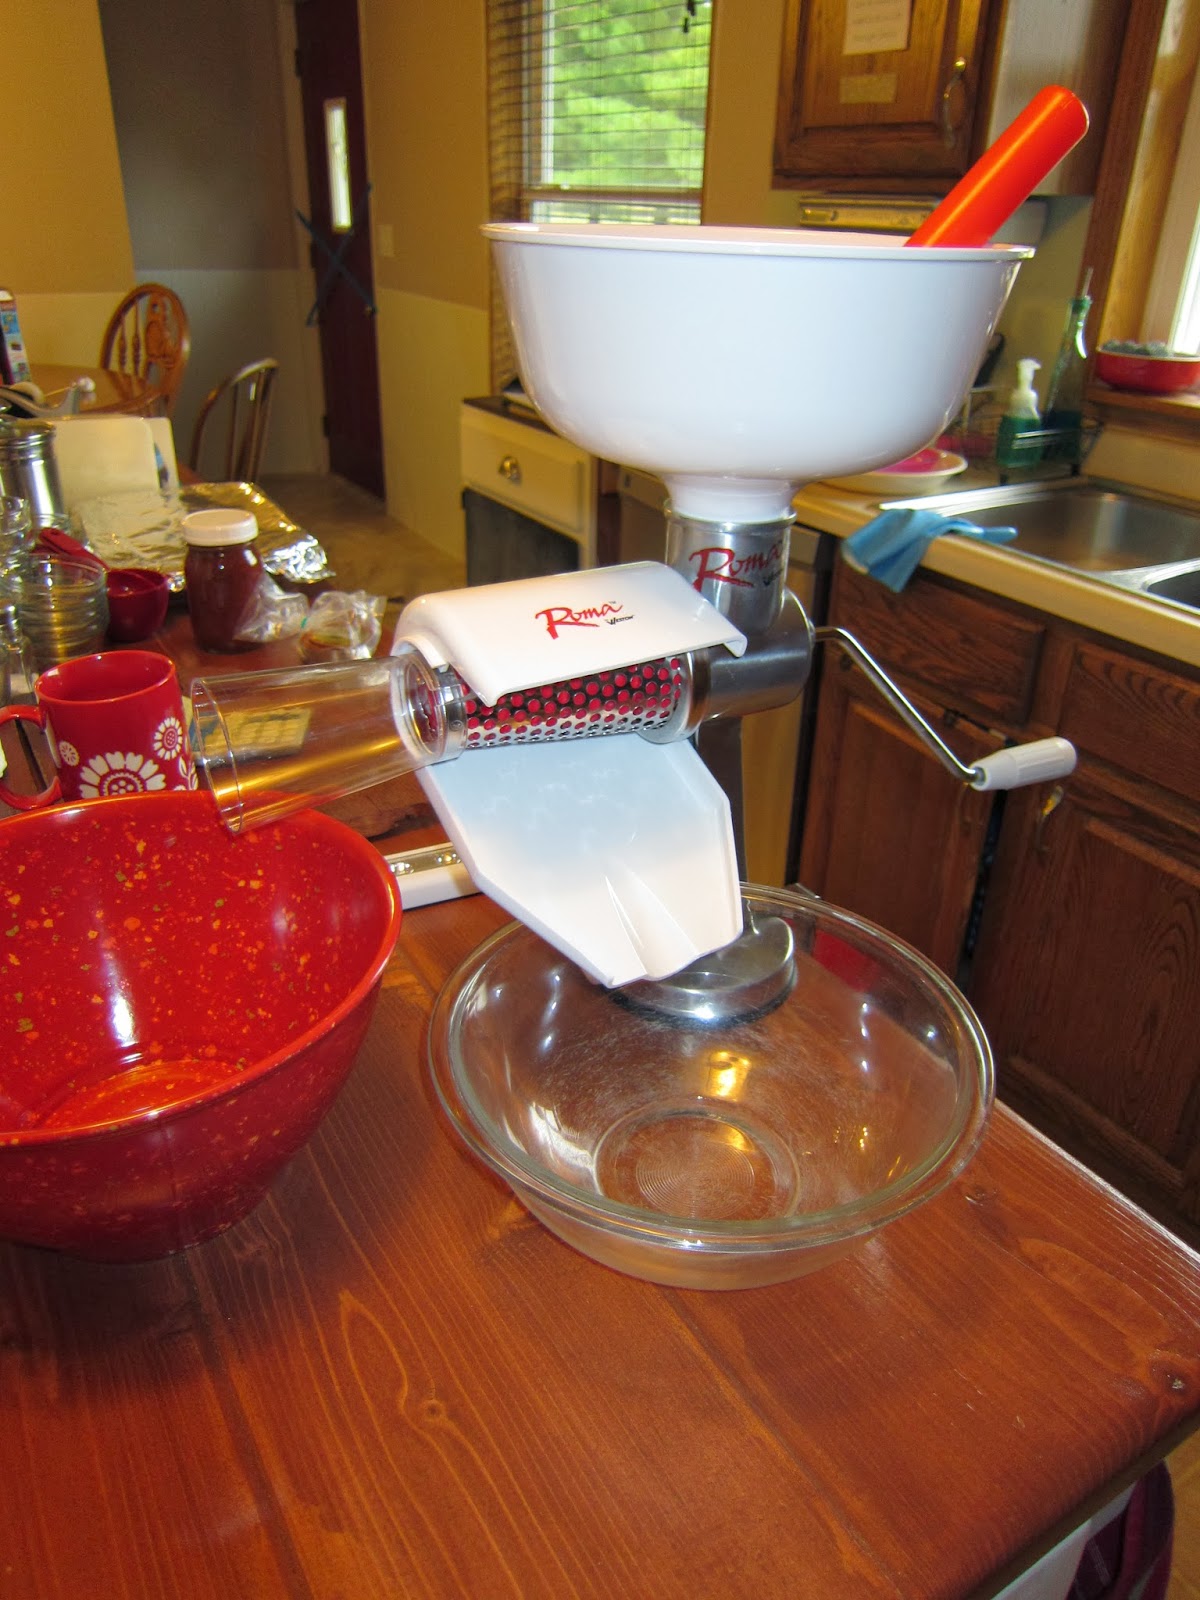
Next I set up my strainer. I used to go through the process of skinning the tomatoes by pouring hot water over a pot of tomatoes and then going at the hot tomatoes with a paring knife to skin and quarter them. But now I have a Roma Strainer. For under $100, I have been able to make the tomato canning process a lot easier. I got it on Amazon, here. And the salsa screen, which I use for tomatoes and salsa, I got here.
 
Now all I have to do is core and quarter the fresh tomatoes and run them through the strainer. It does yield a thinner, saucier tomato product, but I like that because it makes the perfect consistency for spaghetti sauce, chili and soup.


 The tomatoes are passed through the screen with the crank of the strainer. This crushed tomato puree is what I will can.
 
 
This is the waste end. Skins and core.
 
By now your canner is boiling, so you will need to add your clean jars to it to sterilize them. They need to be boiled for 10 minutes. Then they will need to remain in the hot water until you are ready to fill them.
 
 
Also add the lids to a simmering pot of water. Do not boil the lids, the water should be about 180 degrees. The rings/bands just need to be clean, dry and set off to the side.
 
 
 Now add the tomato puree to a pot of it's own. At this time I add canning salt. To be honest, I do not measure, I just sprinkle it over the top. But it is probably about 5-6 teaspoons for a full pot of tomato puree. At this point I'm able to see that with an almost full 8 quart pot of tomatoes I will get approximately 5-6 quarts of  stewed tomatoes. I always can 10 quarts at a time so I can fill my canner.
 
 
Once your tomatoes have reached a boil and your jars are sterile, you are ready to fill them. Using a jar tongs, put a jar from the hot water, empty the water into the canner and set a canning funnel over the hot jar.
 
 
Add two tablespoons of bottled lemon juice to each quart jar. If you are canning pints use one tablespoon of lemon juice. This is a VERY important step. The lemon juice brings the acid level up high enough to safely can your tomatoes in a boiling water bath.
 
 
Make sure to leave 1/2 inch headspace at the top of your jar when filling. After filling, clean the top of you jar with a clean towel, grab a heated lid from the simmering pot with a magnetic lid wand. Place the lid on the top and finish by screwing on a ring/band just until resistance is met- fingertip tight.
 
 
Add your filled jars one at a time back to your canner. Make sure the water level clears the tops of the jars by 1-2 inches. Add water if necessary. Put lid on canner and bring water to a boil. Start counting processing time when water comes to a rolling boil. Process quarts for 45 minutes. Pints for 40 minutes at a gentle but steady boil. All this information is for those that are NOT at a high or low altitude. Special instructions are available online for those folks. Or what I highly recommend for all my fine readers, if you are going to give canning a try; please purchase the Ball Blue Book guide to preserving. It's an inexpensive and valuable canning reference. And make sure you have the most up-to-date book. The research in home preservation is constant. Also I must warn you to please be safe when canning foods at home. You can do it with great success, so do not be afraid, but follow the latest procedures and try your hardest to do your own research instead of relying on what your mom or grandmother might have done. Hybrid foods are different now then they were long ago. Tomatoes may not be as highly acidic as they once were. That may be the case for other foods as well. Follow the rules and you will be safe! A boiling water bath is safe only for high-acid foods. Low acid foods must be processed with a pressure canner. Do your research before taking on a canning challenge.

For my family canning tomatoes is quite necessary. I have tried to make some of my recipes with store-bought canned tomatoes and it is not the same. So for my yummy spaghetti sauce and chili, it is well worth the effort.


Sunday, October 27, 2013

# 63 Frozen Sweet Corn

I'm very fortunate that my father plants sweet corn every year to give away to family and friends. When the corn is ready it is always a mix of emotions for me...."Yay!" I love the fresh taste of home-grown sweet corn in the dead of winter and "Ugh!" There goes my entire day. The process of freezing sweet corn is a lot of work. And I've got pictures to prove it:)

Puttin' Up Sweet Corn

All you need is sweet corn, some equipment and a day!

1. Husk your corn. My dad always has a mathematical equation to help him and I figure out how many cobs he needs to pick for me. He figures out the cob per bag ratio based on his freezing session and I let him know how many bags I need. He usually picks me between 150-200 ears. I can't remember how many this year but below is a picture of them husked and ready to go.

 
2. Get your largest canner, pot or pots boiling with water. I got a new extra large canner this year, so I could boil 20 at a time! It takes up three of the five burners on my gas stovetop.

 
3. Next, I put two clean wash pans in my sink and fill them with cold water. I do not use the actual sink cause I'm kind of a germ phob.

 
4. Add your cobs to the boiling water to blanch them. I set the timer for 6 minutes.


5. When the timer goes off, remove the cobs from the boiling water and add them to the prepared cold water bathes to stop the cooking process.

 
6. Let them cool to the touch. Meanwhile set up a cutting station. Large bowl, cutting board, sharp knife, measuring cup, freezer bags.

 
7. Remove cooled corn cobs from water bathes, cut the corn from the cob and add it to the bowl.

 
8. Add freshly cut corn to your freezer zip-lock bags per your families needs. We do 3 rounded cups per quart bag.

 
9. Seal, label and freeze. Fresh, yummy, sweet corn all winter long! I do not fuss adding anything to the sweet corn before freezing it. I just pop the frozen corn into a pan with butter and a little salt and that's it! Soooo delicious!

Saturday, October 26, 2013

# 62 Refrigerator Pickles

Refrigerator pickles are a fast easy way to "put up" pickling cucumbers...even if it's only for a month. My family loves pickles and we tend to eat them more in the summer. So refrigerator cucumbers are the way to go! I have canned dill pickles in the past, but nothing compares to the crisp, crunchy, fresh taste of these yummy pickles.

Refrigerator Pickles
Makes about a gallon of pickles
1 1/4 cup sugar
1/2 quart apple cider vinegar
1 quart water
1/4 cup canning salt
1 Tb. pickling spice
2 heads dill
2 cloves garlic, crushed
1/2 large onion, thinly sliced
Pickling cucumbers, thinly sliced- enough to fill jars

1. Wash your jars. I use 1/2 gallon jars for refrigerator pickles.


2. Add sugar, vinegar, water, salt and spice to a saucepan and heat to a boil.


3. Thinly slice pickling cucumbers and onion with the slicing attachment on a food processor. Or you can use a mandolin if you have one.


4. Add dill and crushed garlic to the bottom of a clean 1/2 gallon mason jar. Then fill jar with sliced onion and cucumbers.

 
5. Then fill with the pickling brine.


6.  Cap your pickles, let them cool and put them in the refrigerator. They will keep for one month. I have heard people keep them for much longer than that, but if you want them fresh and crunchy, they will taste best within the month. They do not last that long in my house. We eat them as a side dish in the summer. They are much loved by every member of my family.

Friday, October 25, 2013

# 61 Applesauce

The fall is always the time of year for bringing in the harvest and doing something with it. Unfortunately, I was not able to do all that I wanted to do this year, because I was in over my head in a kitchen remodel at harvest-time. Oh well, maybe I can plan big for next year!! But for this year next up is applesauce!

Applesauce

2 1/2 to 3 1/2 pounds apples per quart
Water
Sugar (optional)- I do not add sugar!

1. Wash apples. Core and quarter. I will be using a strainer so I will cook mine with the peels on, but if you do not have a strainer, peel them as well. I got my Roma strainer here. It is great for canning tomatoes which I will post about soon and also great for making applesauce and salsa. The accessory kit is pretty essential as well for using the strainer for foods other than tomatoes. I use the salsa strainer in the accessory kit for most everything.

 
 2. Cook apples until soft in a large covered saucepot with just enough water to prevent sticking.

 
3. Puree using a food processor or food mill. In my case I used a strainer which is like a food mill. If you are using a food mill, you can possibly get away with not peeling the apples before cooking. I personally do not like peeling apples, so my strainer is a great tool.


Above you can see the applesauce coming down the shoot and the skins coming out the tube. Works great!

4. Return applesauce to the saucepot. Add sugar at this time if desired- about 1/4 cup per pound of apples to taste. Bring applesauce to a boil, stirring to prevent sticking. Maintain temperature at a boil while filling jars.


5. Make sure your jars are sterile...you do this by boiling them for 10 minutes.


 Heat lids in a simmering pan of water before using.
 

 6. Ladle hot sauce into hot jars, leaving 1/2 inch headspace. Remove air bubbles. Adjust two-piece caps.


7. Process pints and quarts 20 minutes in a boiling water bath.
 
 
I removed the cover just to take the picture. Process your jars with the canner cover on.
 
And that is how you make homemade applesauce. My kids very much prefer homemade applesauce. The only reason I do not make enough for the entire year is because it is so expensive to make. We have planted quite a few apple trees but they are not fruiting quite yet. So I can't feasibly justify the cost. It's nice to have a few jars on hand, but my family goes through at least 4 jars a month of applesauce. And a jar of "natural" applesauce in the store is under $2.00. So we buy it and save the homemade for a once in a while treat!